Webstudio streaming guide
Last updated: September 8, 2025
❕ Going live in a nutshell
- Log in to Videosync Admin at videosync.fi/login
- Get ready for live with your camera and mic and go to Live - Web studio
- Share presenter link to external speakers if you have any
- Setup the studio stream for the live event
- Test with Preview that everything looks good
- Start recording and go live
- Control your presentation, chat and polls
- End the live event and publish recording
Before the event: Set up the Web Studio
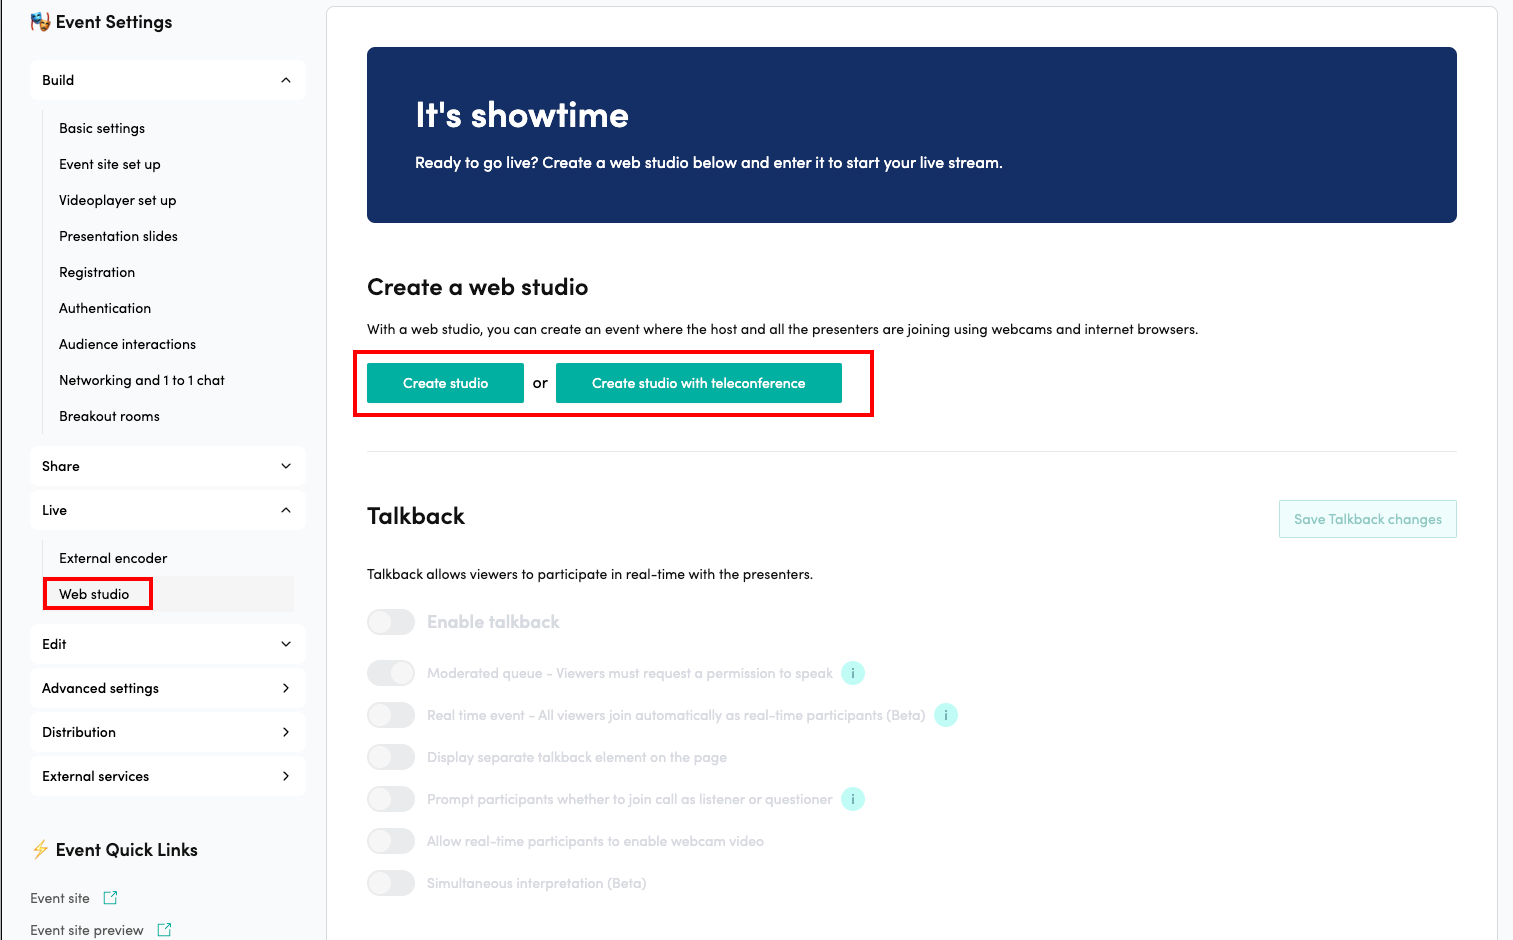
Create a Web studio for event
Under Live → Web Studio click Create Studio or Create studio with Teleconference
The option ”with Teleconference” means that you can have dial-in access to for audience to ask questions via phone. If you already have Teleconference bridge set up for this event, the web studio will use the existing bridge.
More instructions for teleconference links can be found here:
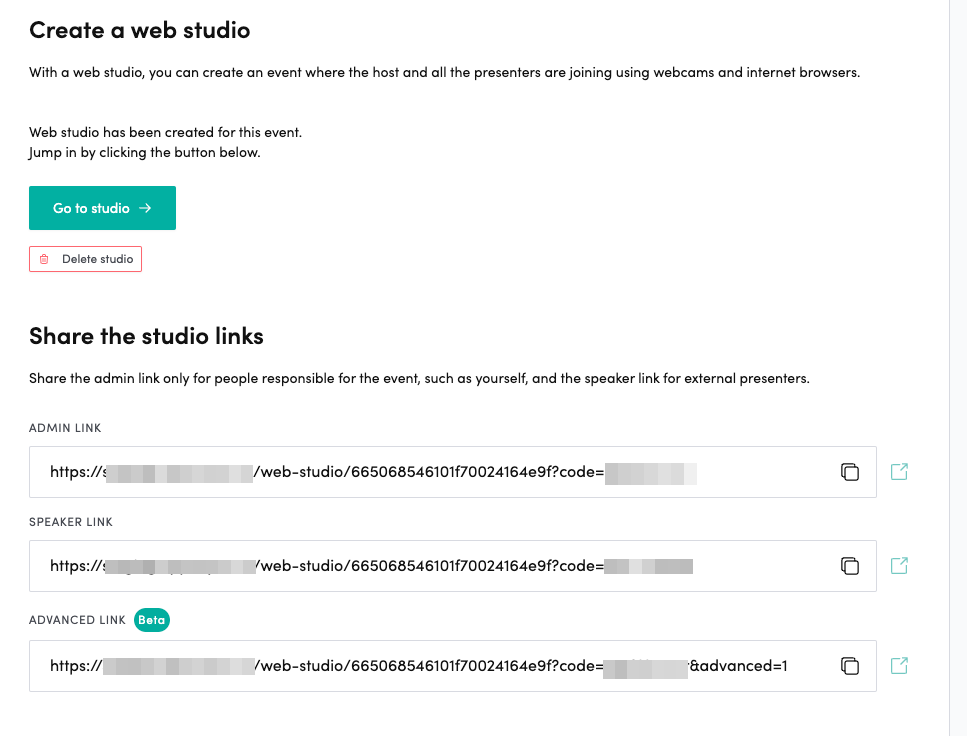
After creating the studio, you can access the studio by clicking Go to studio button.
You can also copy the studio links:
- Admin link is for event hosts or moderators to control the event
- Speaker link is for remote speakers who should be able to speak but should not control the live event
- Advanced link is for professional studio usage and for testing new features. Videosync team may ask you to use the advanced link in some use cases
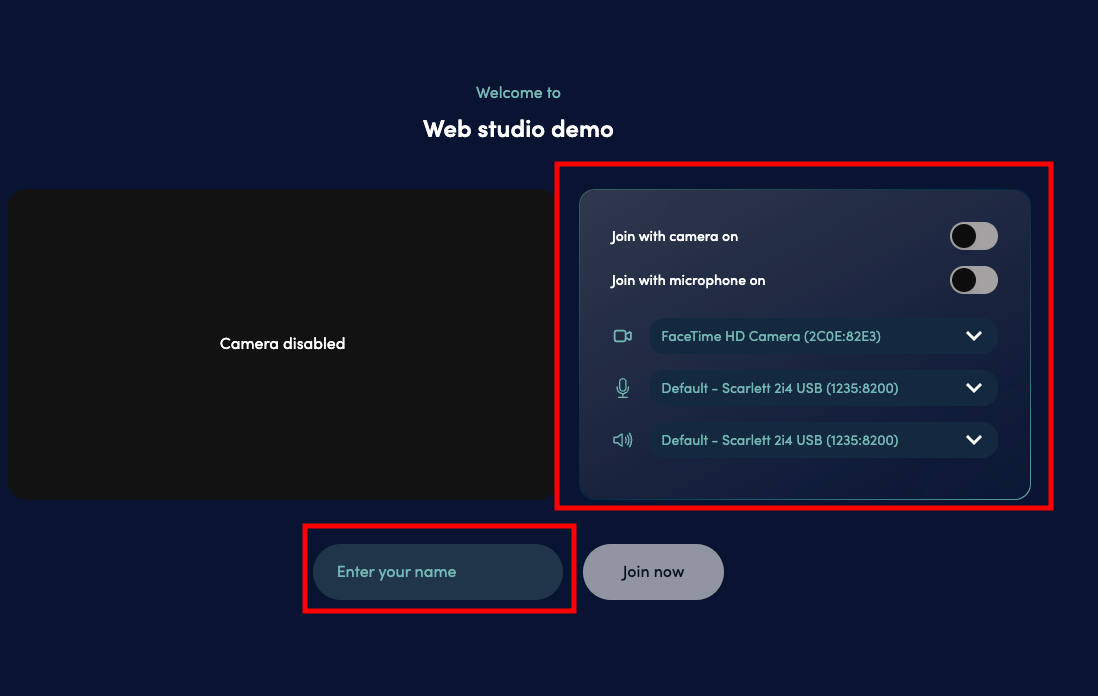
Open the studio: set your audio and video devices
When you join the Web studio, please choose the right camera and microphone. Allow access to camera and microphone if your browser asks it.
Enter your name. This name is visible only for other admins and speakers in Web studio - not for participants.
Check that your image looks balanced. If everything works, join the Web studio.
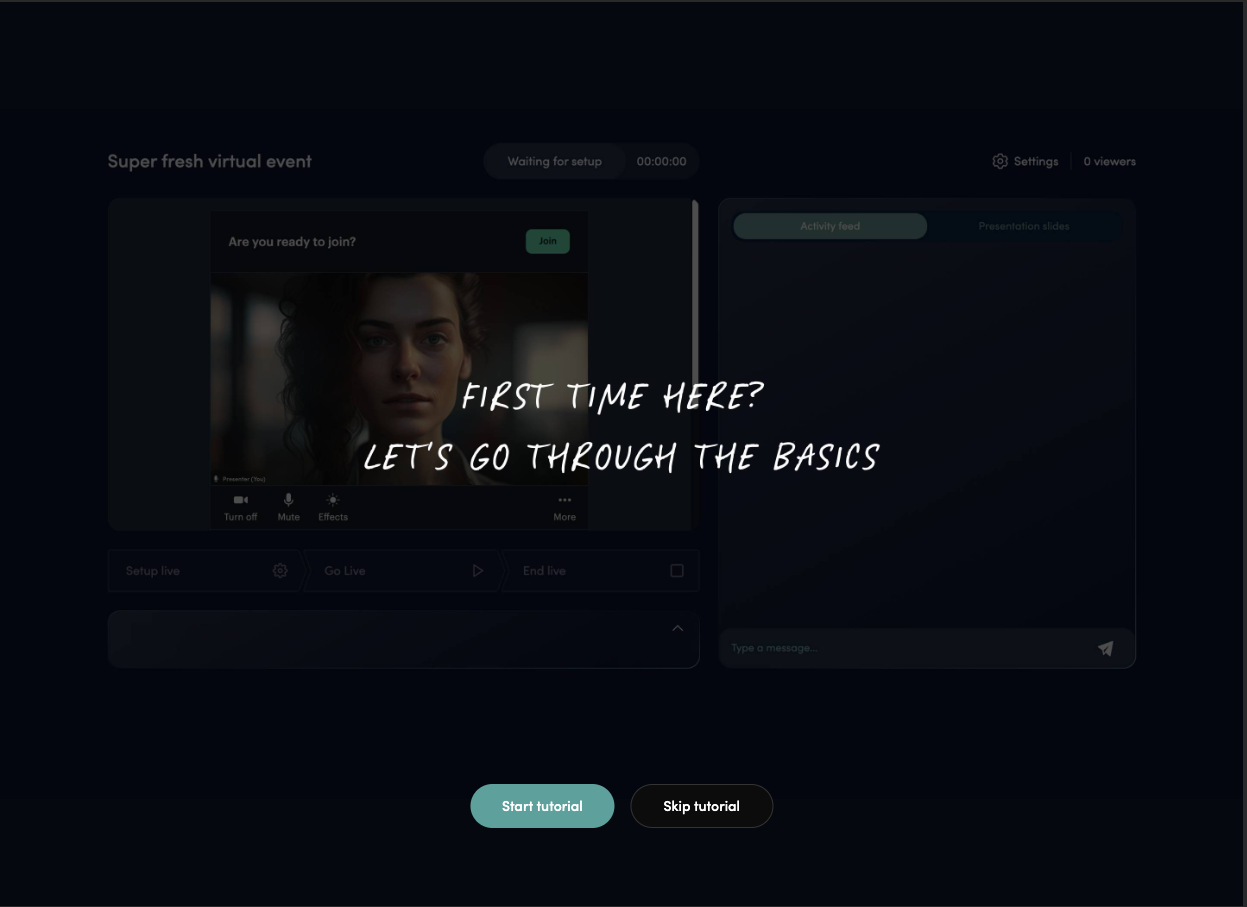
When you use the web studio for the first time, the studio tutorial will appear. You can also open the tutorial later from the top-right corner by clicking on the ‘Help’ button.

You can still modify and test your camera and microphone settings from behind the ‘Settings’ button.

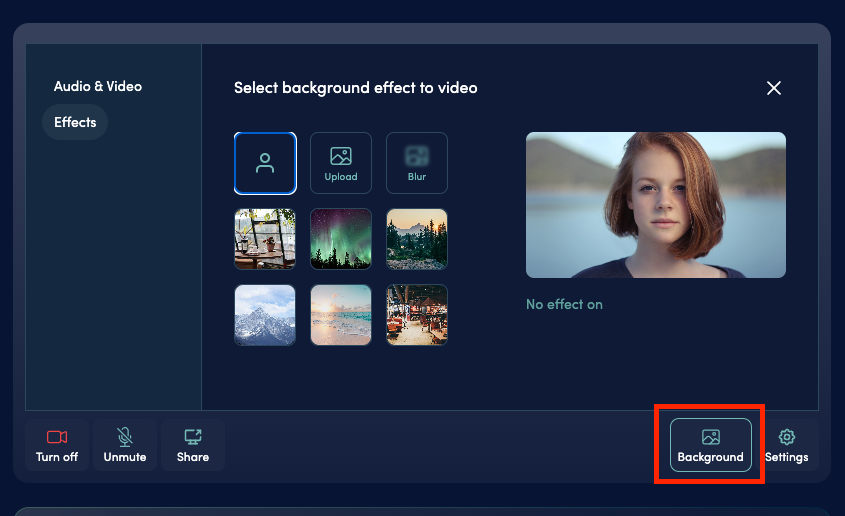
You can choose and upload a background image for your video from behind the ‘Background’ button. The recommended dimensions for background image is 1920 x 1080 px.
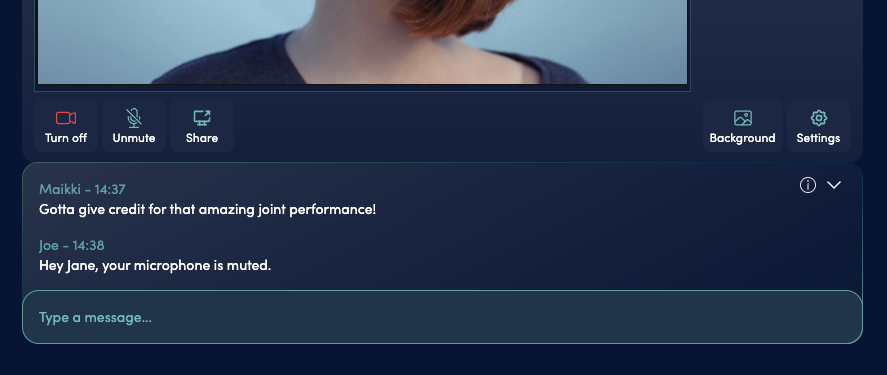
You can chat privately with other presenters in backstage chat.
Prepare to go live
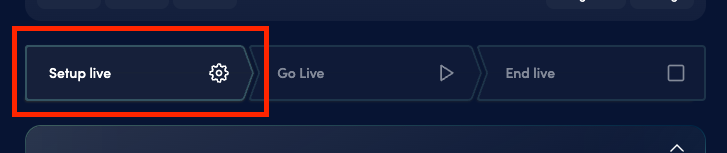
Around 10 minutes before the event starts, you should setup the live event.
Click on Setup live to do that. This will not publish your stream to audience yet but it prepares the event for going live by starting the video processing and connecting the Teleconference (if enabled) to the Web studio.
Previewing the stream
The audience can’t hear or see you yet, but you can preview your video and audio on the preview link. ( Settings → Preview link )
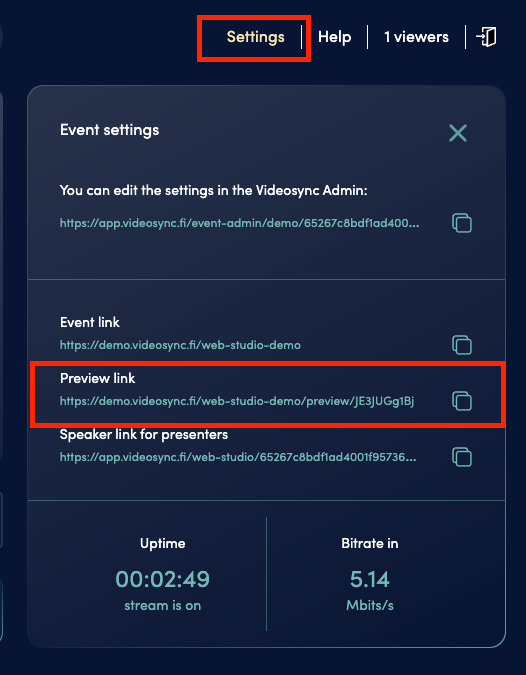
When you see status ready to go live, your event is ready to be started
❕ Note that there is a delay of 10-15 seconds in the stream, but your slides and speech are in sync. You can also access the Event page in event link and see that you’re not yet live to the audience.

If everything looks good, you’re ready for the live. You can go and click go live.

Please do not start speaking before you have clicked on the Go Live button. When going live, in the top of your browser there is a status indicator that will turn red and state “Live and recording” and this indicates that you are live and everything is running smoothly. Note that there might be some delay (even up to 10 seconds) in the indicator state change, but you do not need to care about this - you can start speaking almost immediately after you have clicked Go Live.

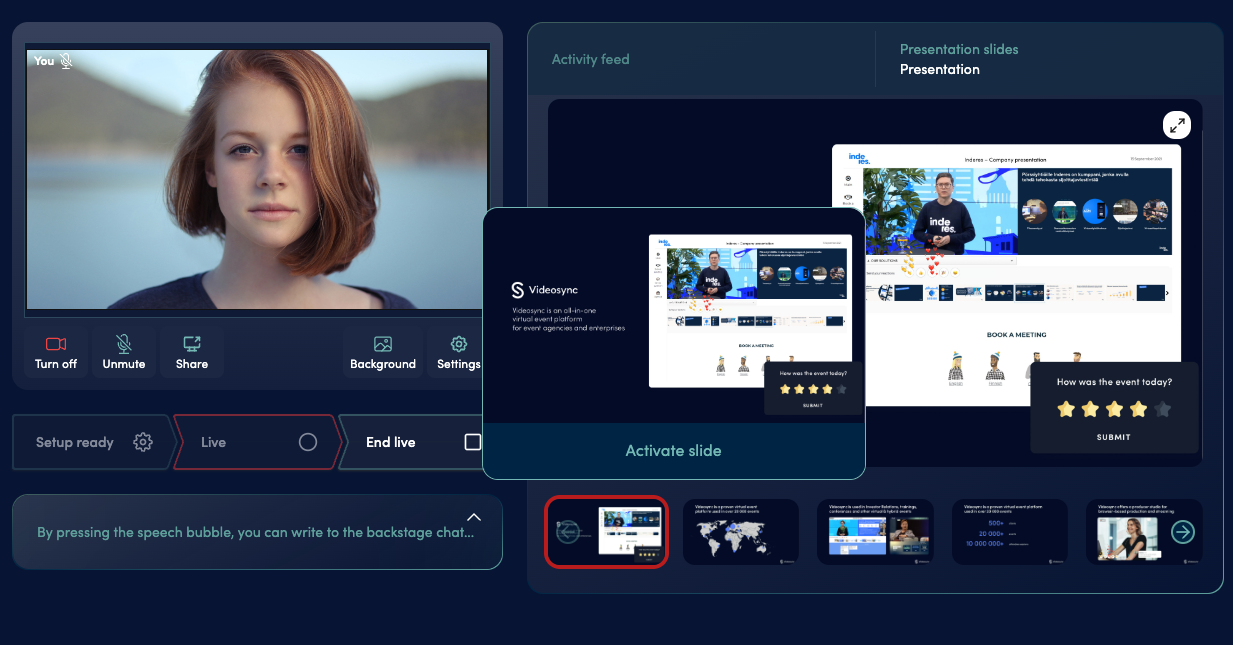
During: Control your live event
Activity feed: Moderate chat
In the activity feed on the right, you can view all the polls and messages sent in chat. You can manage and respond to them as desired. You can also filter them using the dropdown menu.

Presentation slides: Change slides for audience
To activate slides, go to the presentation tab, and in the dropdown under Presentation, you’ll find the ‘Manage Slides’ section. From there, you can organize and add slides.

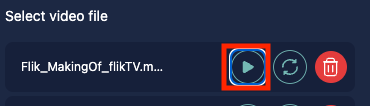
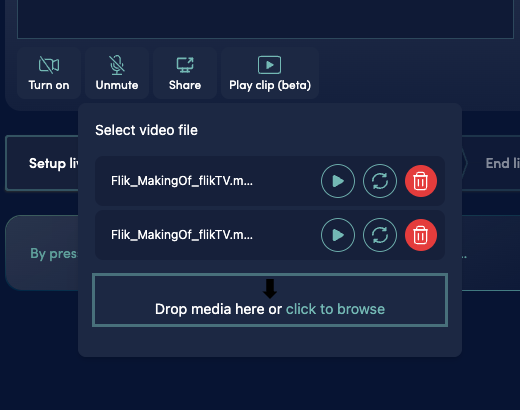
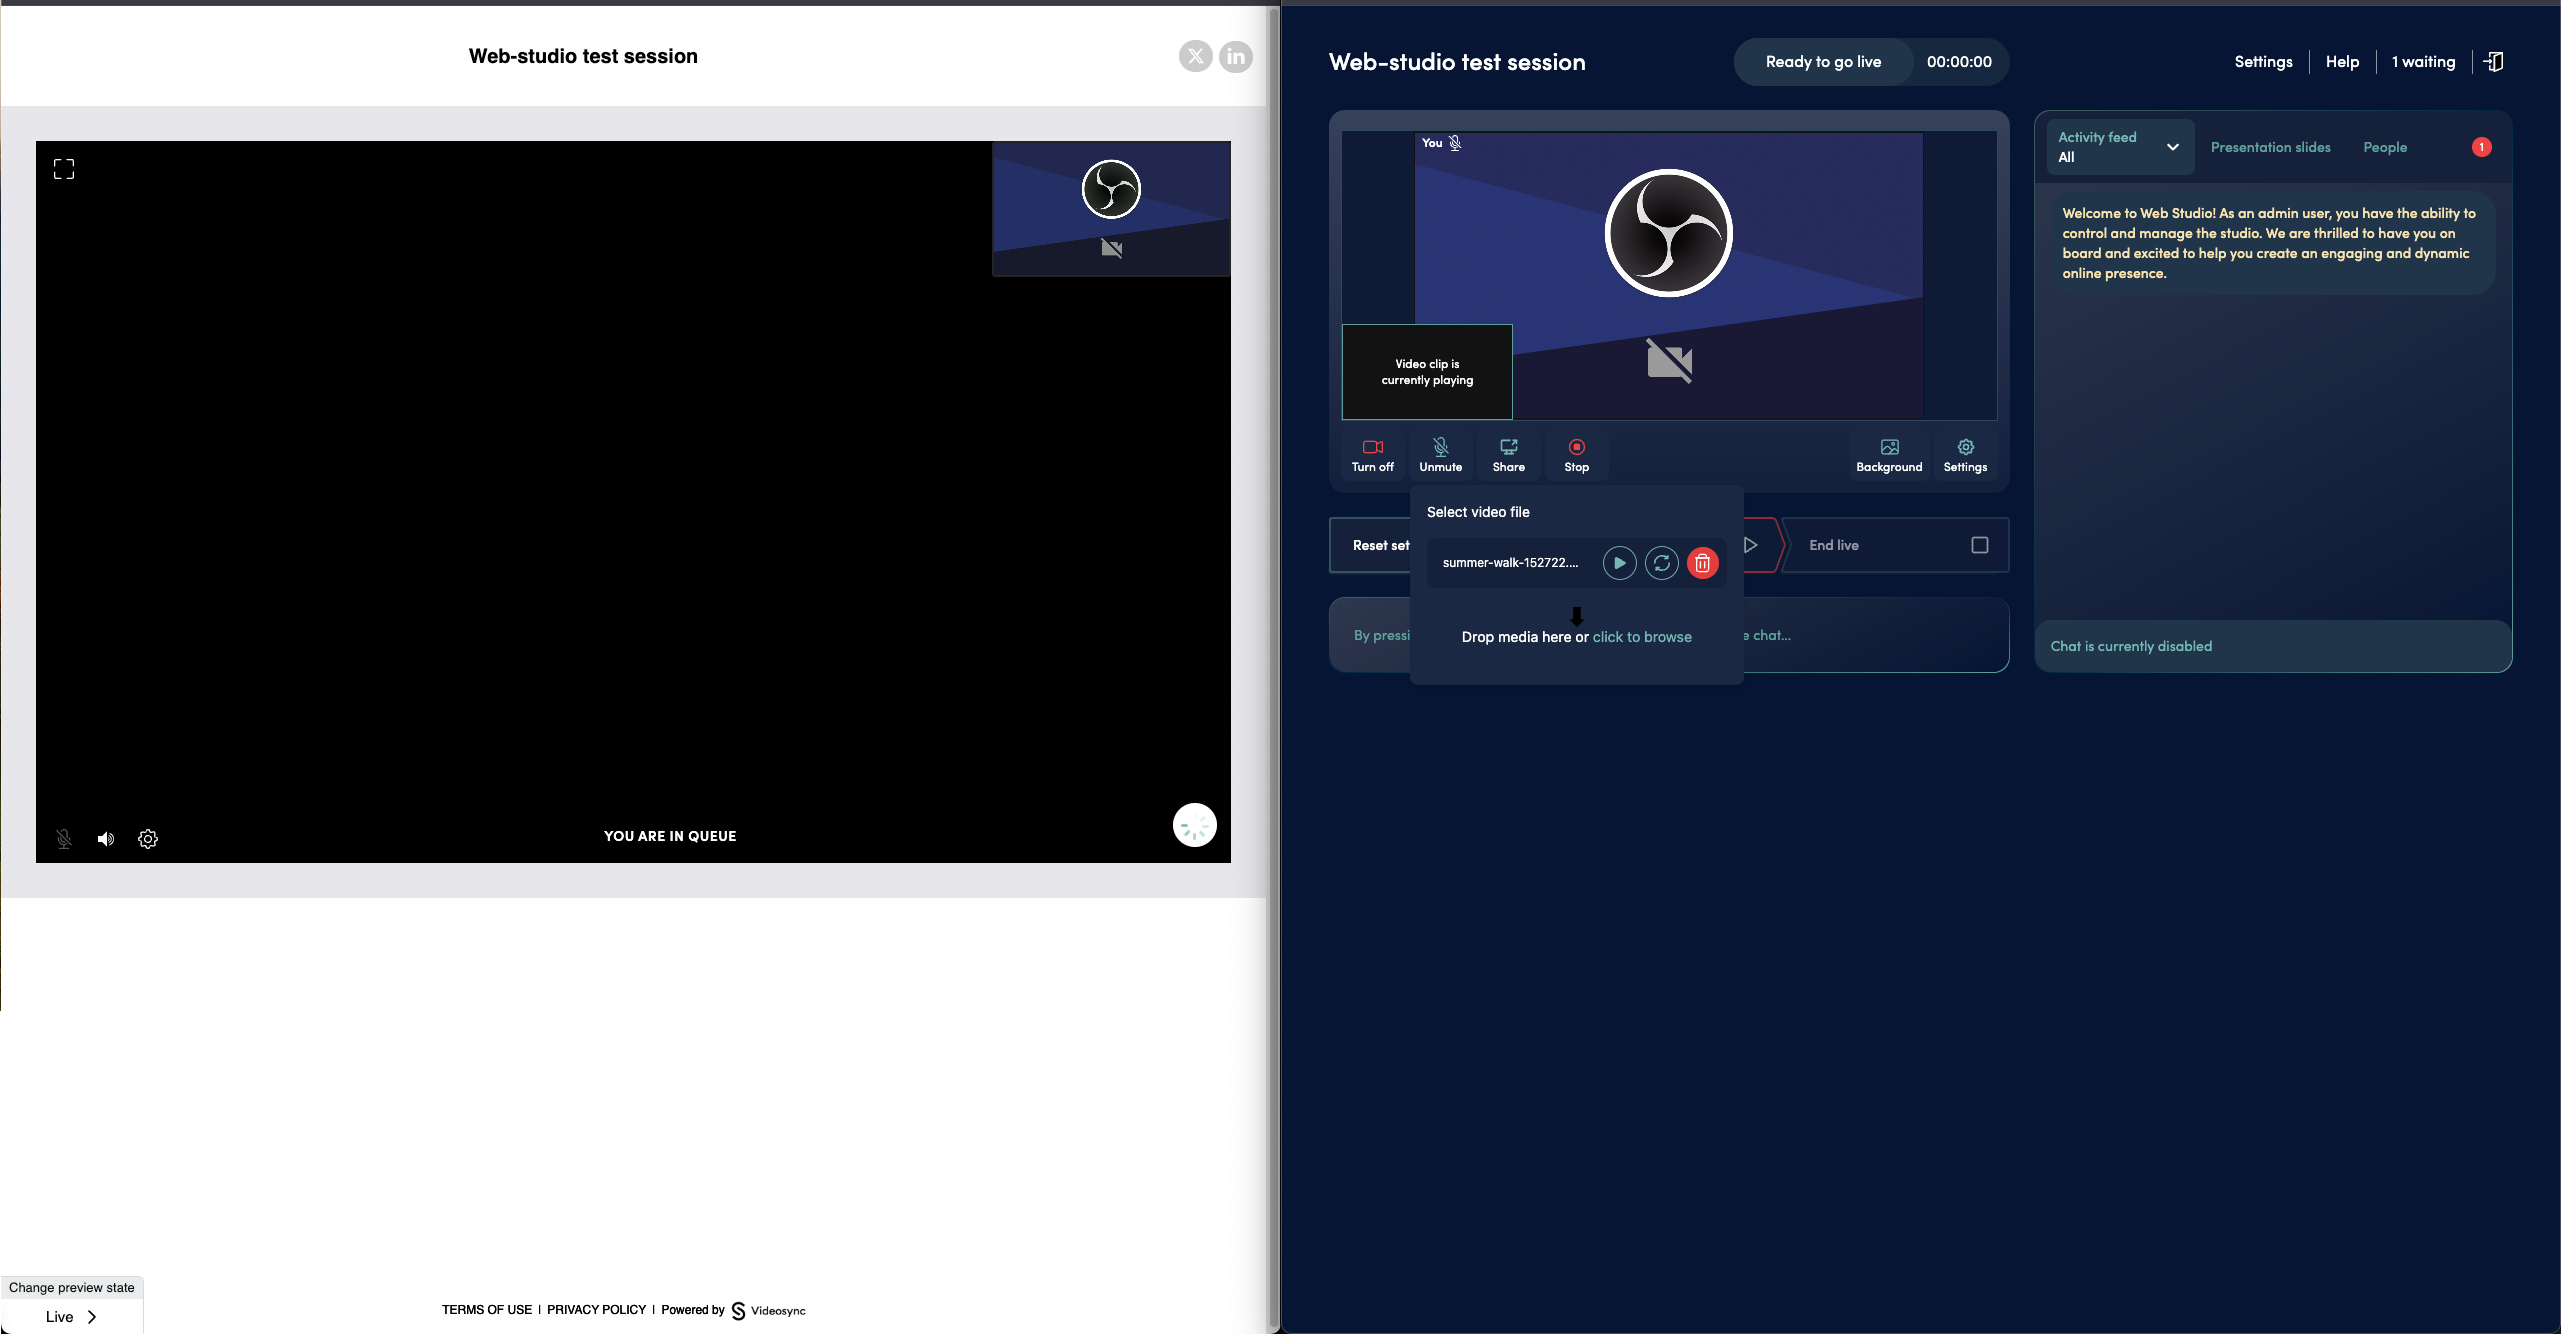
Pay clip (beta)
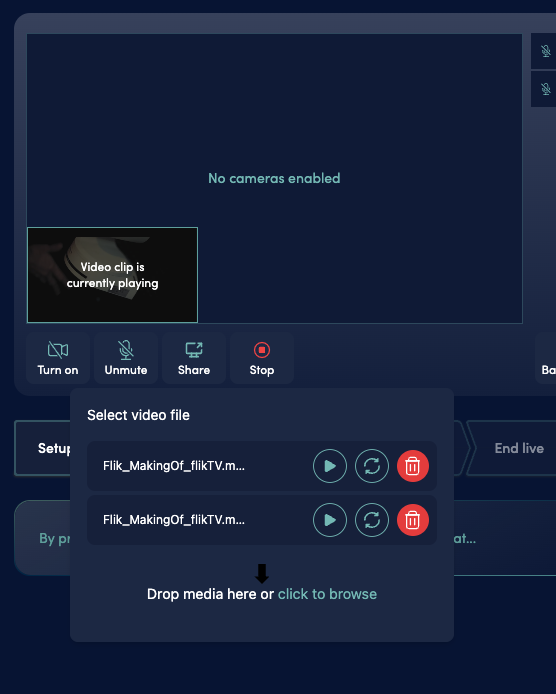
Play Clip is a feature that allows you to upload your own videos to the Web Studio and play them.
The clip will play for all viewers, speakers, and admins.
Supported file types are .mp4, .mov, .mkv, .webm, .mp3 and .aac.*
Play Clip Once
will play the clip only once. You can stop the clip by pressing stop.
Play Clip on Loop
will continuously play the clip until you press stop.

You can delete the clip by clicking the trash bin icon.

*Note that if you use an audio file, play clip will display a black screen to viewers.
When the clip is playing, it should appear like this. You can stop the clip by pressing the stop button.
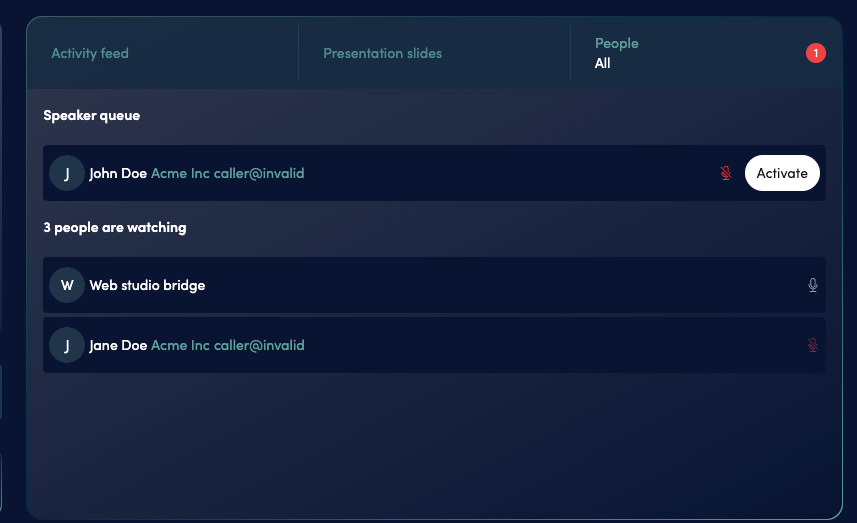
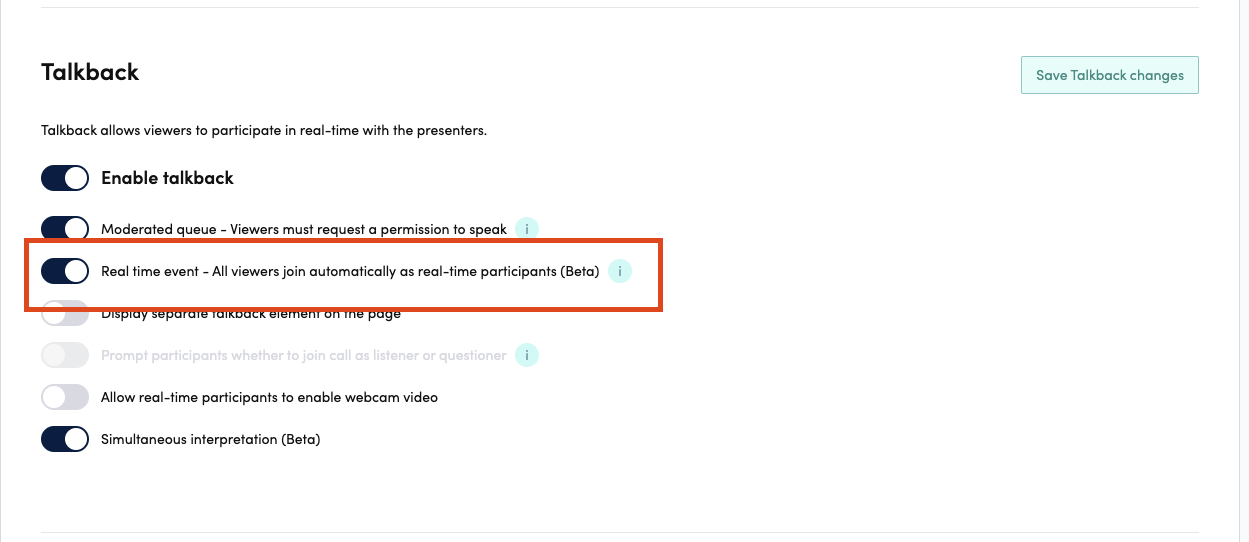
People: Raised hands from Talkback and Teleconference
If your event has Talkback (”raise hand” on event page) or Teleconference enabled, you’ll see the Raised hands from the audience on People tab.
When you are ready for audience questions, you can activate the participant’s microphone by clicking “Activate”.
- Teleconference participant’s microphone is activated immediately
- Talkback participant is given a permission to open their mic and the participants will still need to unmute themselves The participant’s name is automatically being announced by virtual moderator as “The next question comes from John Doe from Acme inc. Please go a head”.
If you want to disable the virtual moderator or change the language, go to settings and adjust set settings accordingly.
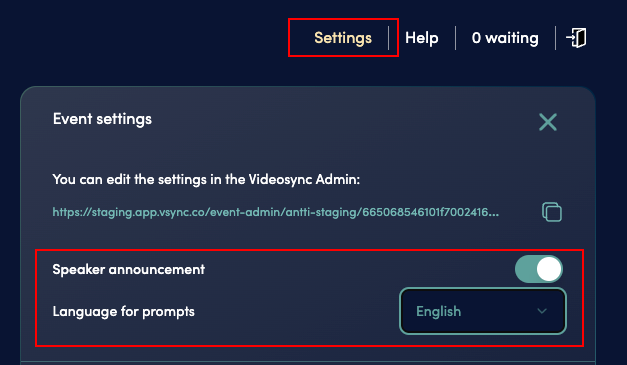
You can also use the virtual moderator to play out text to speech prompts the People → In the queue page.

End live and stop recording
When you’re ready with your event, just click End live in the state selector. Now your event is no longer streamed on the event page and the recording has stopped.
The Web Studio state should appear as follows after completing these steps.


Congrats, your live is over and recorded! 🎉
Publishing the recording
If the stream went smoothly and no editing is required, click the publish button. This will upload the recorded version of the presentation to the same audience link for on-demand viewing.
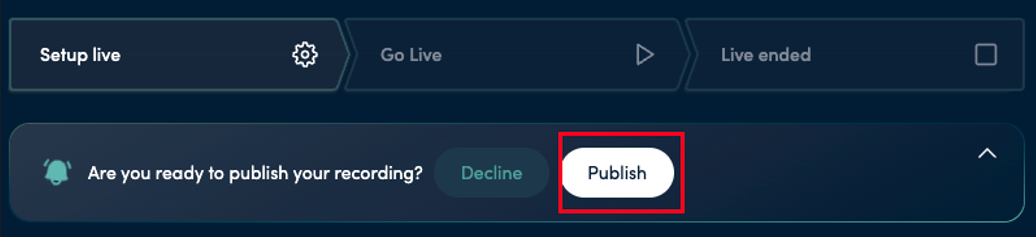
If you need to edit the recording, you can do so in Videosync Admin panel and then publish the recording instead of publishing it directly in Web Studio.
After: Edit and publish recording
-
After your event, you can edit the recording in Edit - Recording editing.
-
You can easily modify the video clip: Trim the recording from beginning or the end or add, remove and move slides, chapters or polls.
-
You can also add new video clips if needed
-
After editing, click Process video changes to save your changes

-
When you’re ready to publish your recording, change its event state to Publish recording. Now your recording is available on the event site!
-
For more detailed instructions on editing, check Editing and publishing a recording
Related articles
In Web Studio, interpretation works during the live session. The recording needs to be handled separately.
Web Studio translations setup only works in real-time stream. Meaning that the entire event is real-time (Web Studio → Talkback → Real-time event - All viewers join automatically as real-time participants).
If you need a multilingual HLS stream, check this guide.
Setup:
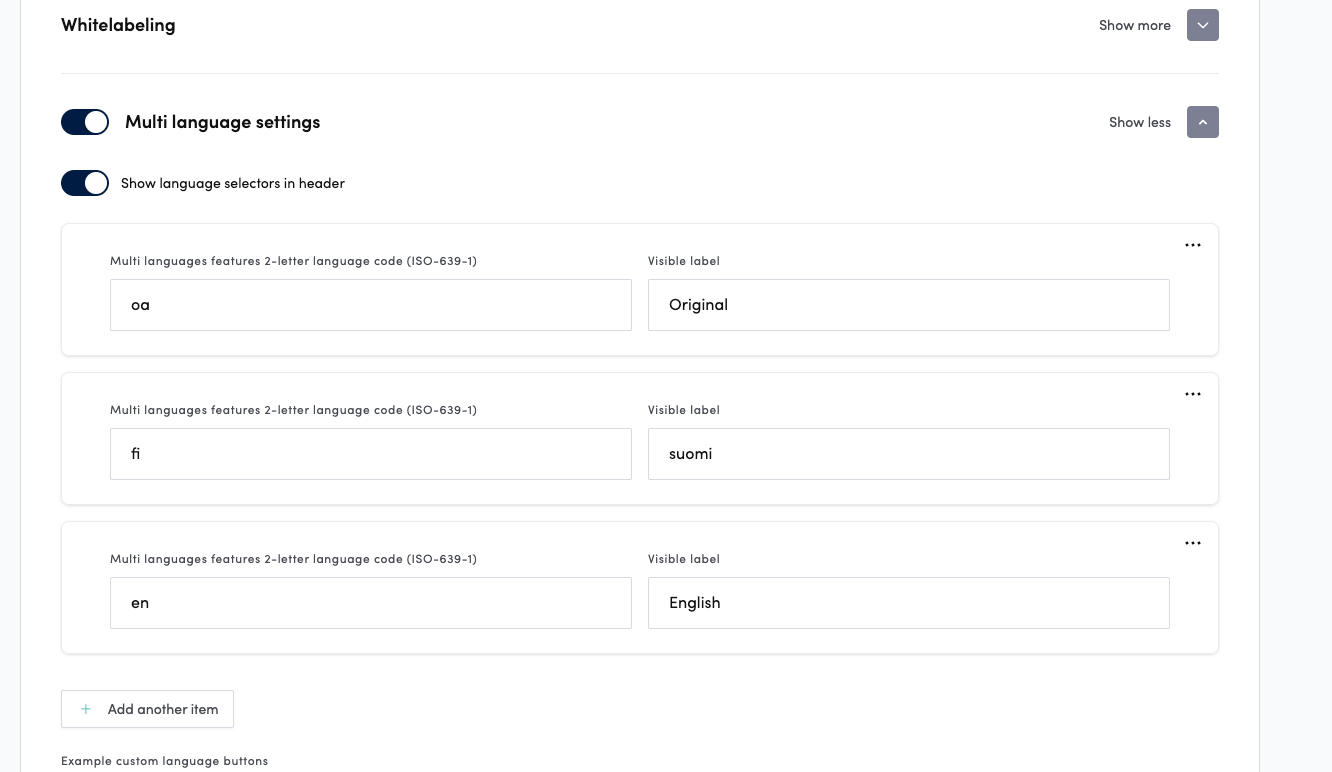
To enable interpretation in Web Studio, go to Advanced Settings and create the languages to be interpreted under Multi-Language Settings.
(Custom buttons also work.)
After this, when you create the Web Studio and enable Simultaneous Interpretation (Beta) under Talkback, the Simultaneous Interpretation Links will appear.
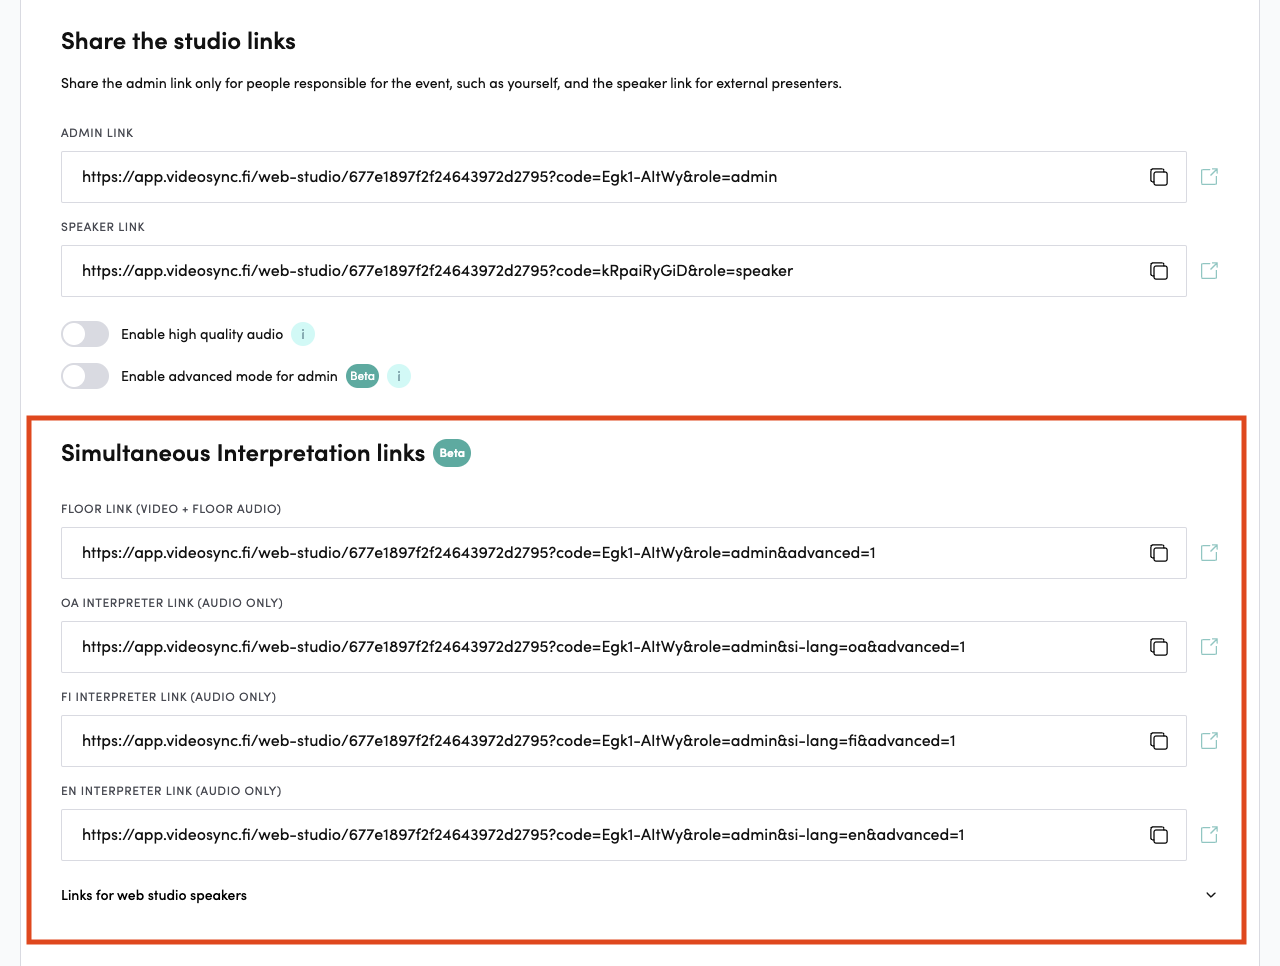
The visible links are for interpreters. If you need a link for a speaker who should hear only a specific language (and is participating via Web Studio), you can find these links under Links for Studio Speaker (different from the viewing page participant).
Teleconference with SI Web Studio
Doesn’t work properly: On the phone, everyone hears everything (floor + all interpreters). (All interpreters + floor hear everything from the phone.)
Who hears whom:
Web Studio
-
Floor hears only the others Floor audio + talkback questions.
-
EN interpreter hears Floor + others EN interpreter audio. Viewing Page (Real Time)
-
OA (Original) hears only the Floor audio.
-
EN hears the EN interpreter’s audio. Talkback speaker → talkback speaker
Talkback (viewer) can hear
Web studio speaker ( ?si-listen → audioLanguage) with lang selected can hear
Known problems in Web studio events
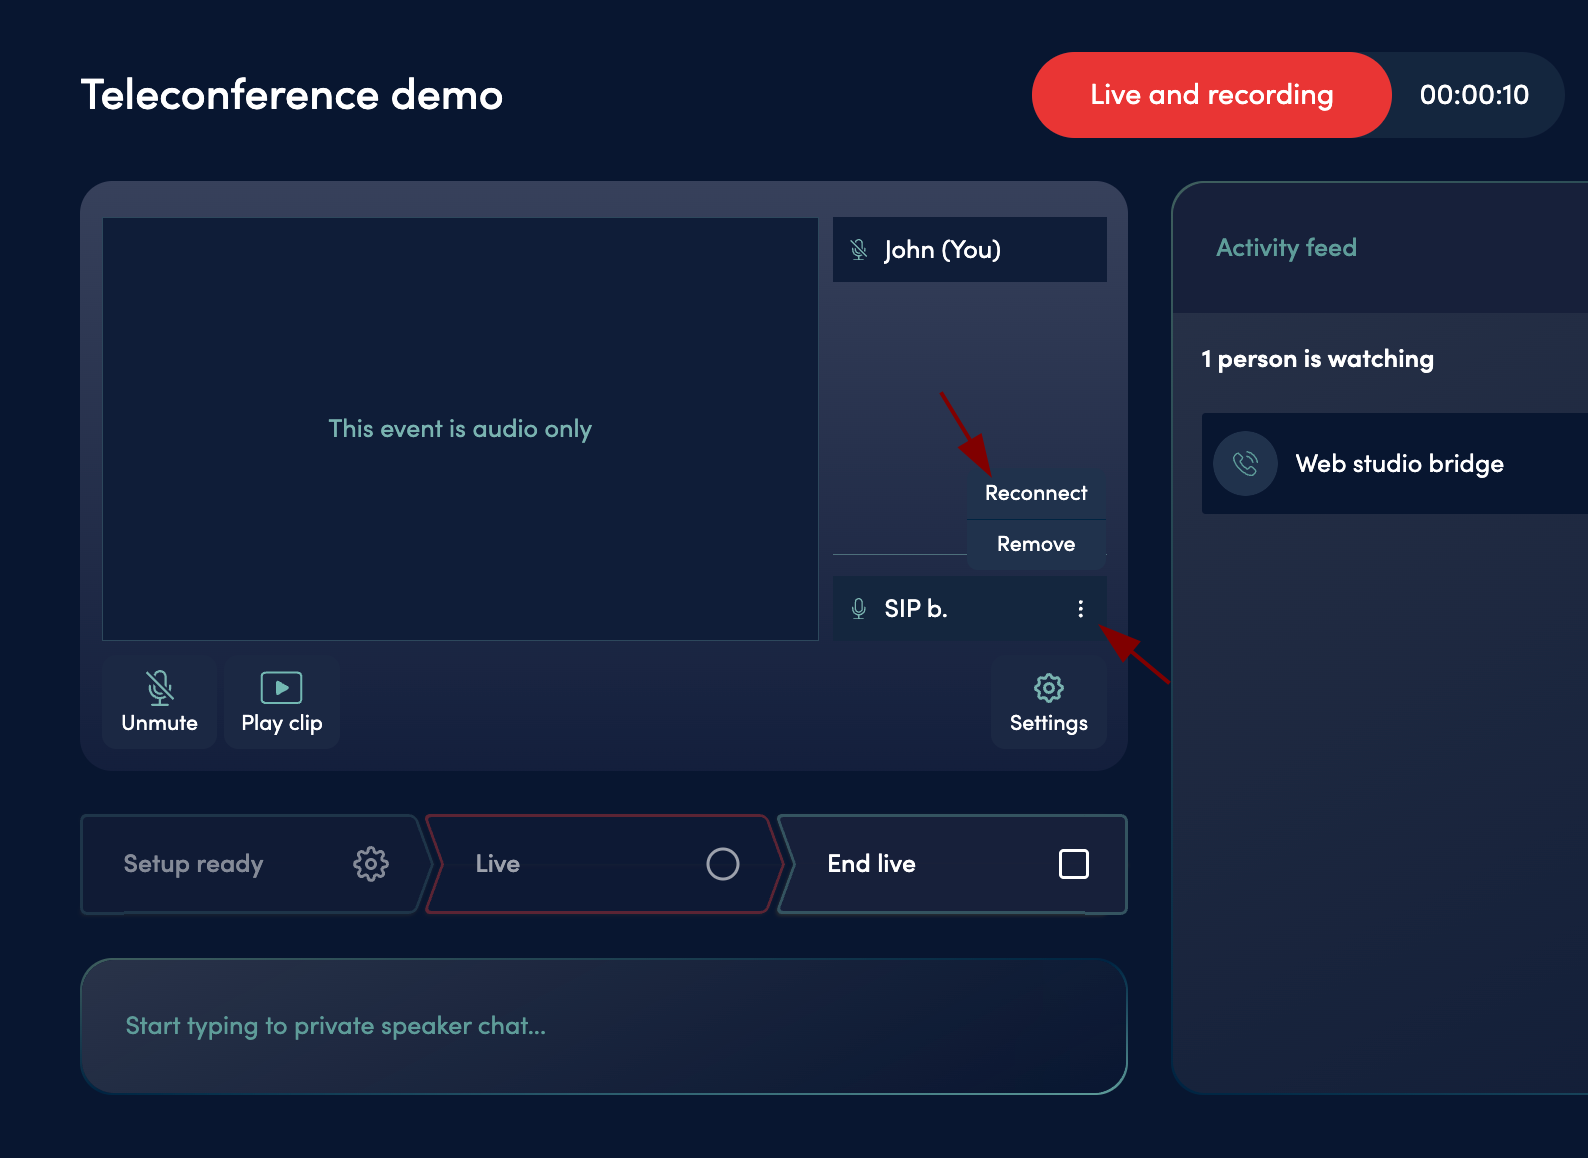
Audio Delay Issue with Teleconference Participants
Update on 5.9.2025: We believe that this problem should now be fixed and we are monitoring the
We’ve identified an issue where a small number of calls are experiencing delayed audio specifically from teleconference participants to the Web Studio speakers. Audio from the Web Studio speakers to teleconference participants is not affected.
We are actively working on a permanent solution to prevent this one-way delay. In the meantime, you can temporarily resolve the issue by resetting the teleconference connection as follows:
- Locate the Teleconference bridge (labeled “SIP b.” or “Phone b.”) in the Web Studio participants list.
- Click the “three dots” menu and select Reconnect.
- Teleconference participants will hear music for approximately 10 seconds while the bridge reconnects.
- Once the “Reconnecting teleconference” notification disappears, teleconference participants will be able to hear you again, and you can continue the conference.
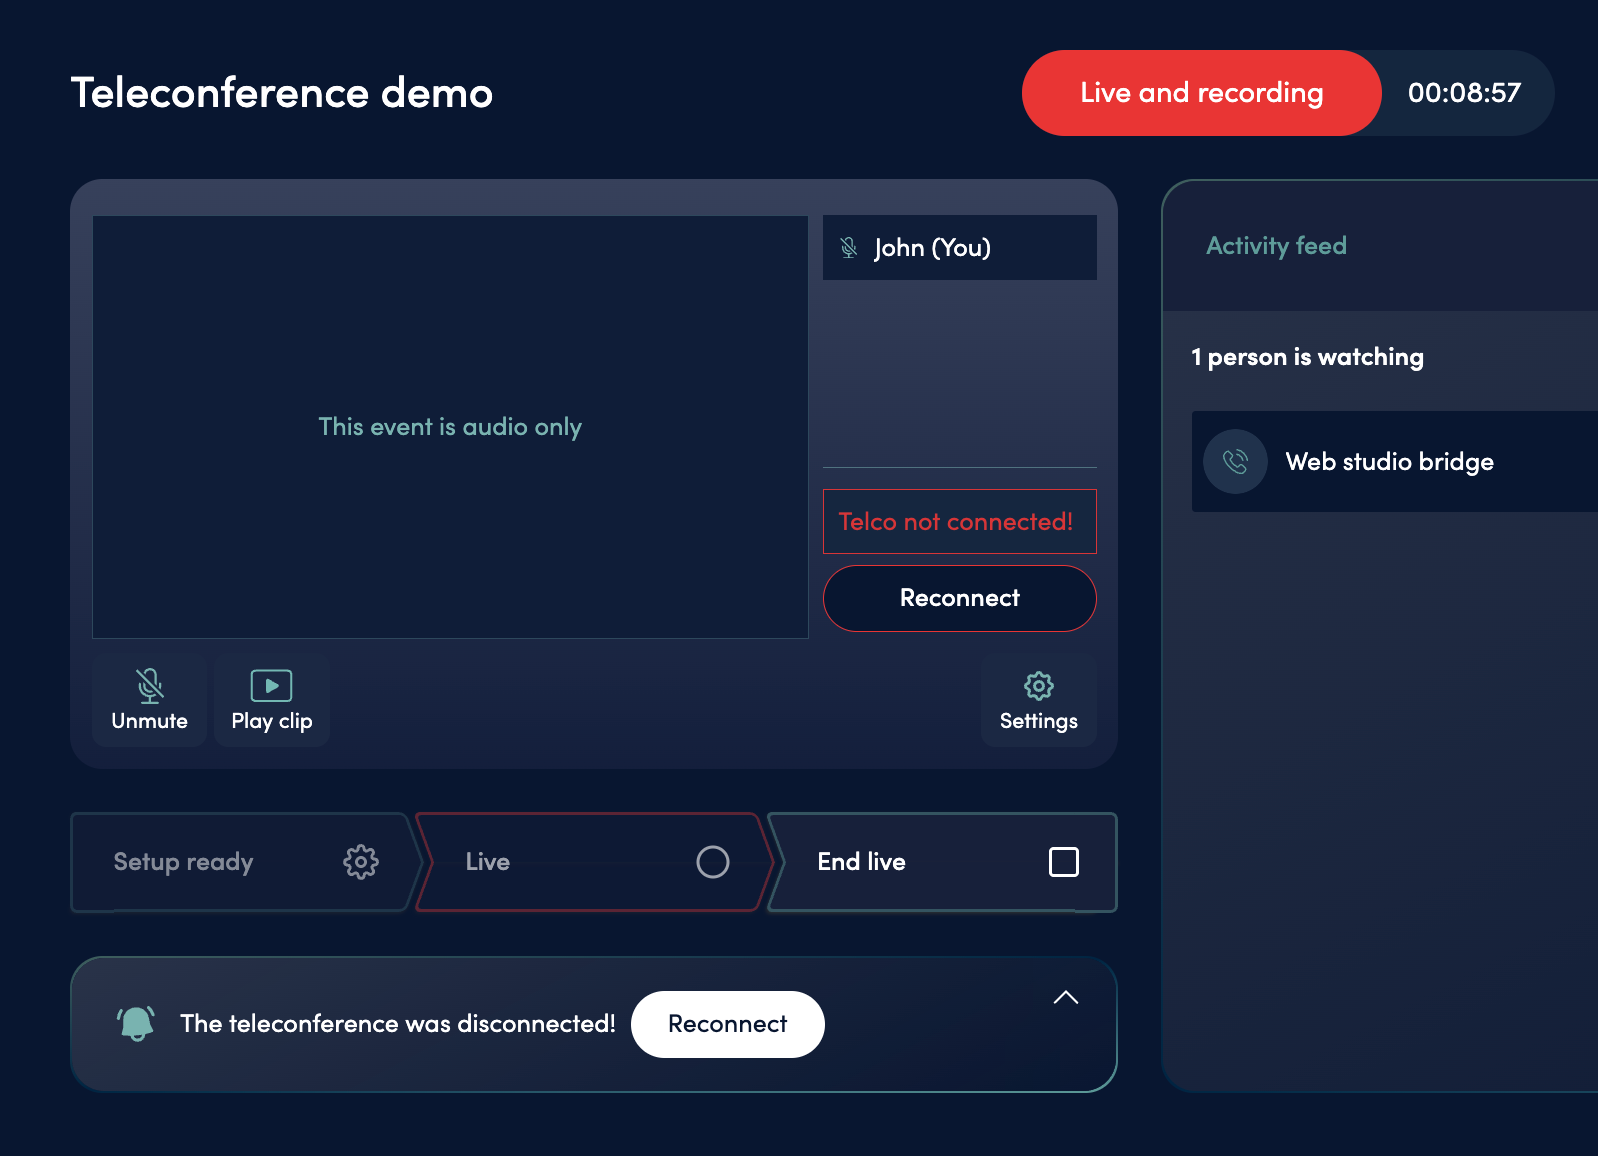
Teleconference Bridge Disconnections
Updated 27.6.2025
In rare cases, the teleconference bridge may disconnect unexpectedly. Symptoms include participants hearing music and their audio becoming inaudible in the Web studio. These disconnections are typically caused by wider network issues.
We are actively monitoring the situation and working to improve stability.
If a disconnection occurs during production:
A “Reconnect” button will appear in both the Web studio speakers list and the backstage chat.
Action:
- Click the “Reconnect” button.
- The teleconference connection will restart.
- Expect the connection to be restored within approximately 10 seconds.
Can't find what you're looking for?
Our AI assistant is here to help you find the information you need.